

GitHub Report Issue Button
GitHub Report Issue Button
I have long admired the Report Issue button on Microsoft Docs and sought to recreate it. Then I loved it so much, I added it to the end of every post! Here’s how, and you can just copy and paste it and then take the rest of the day off!

Post Outline
- Example of What I’m talking about
- Why is this useful?
- OK, I’m sold, let’s make one!
- How to make it into a snippet
- Automatically adding it below posts in Jekyll
What are you smoking, Stephen?
This is a reasonable question to ask anyone, and especially me.
Way back in the day when I was writing a Wiki or docs for work, I knew that if I had a bug or error in my documentation, I could count on my good ol’ buddy Wayne from @waingrositblog to spin in his chair and shout
Yo, this shit is whack, son
before he went back to looking at collectible Transformer figurines and then you knew you had to make some changes to your docs.
But not everyone had a Wayne of their own. So eventually everyone else started rolling comments on their blogs with Disqus or something similar. However they got flooded by Spam and noise and it was hard to stay on top of them.
So now we’re left with needing a way for people to report issues in your posts without using comments which are hard to stay on top of without a lot of effort.
Enter the Report Issue Button, which can be found in a lot of Microsoft Docs, like this page on adding Application Insights to your app.

Why is this useful?
Clicking this button takes the user to the ‘Report an issue’ page but also populated the body of the issue with a lot of useful info.
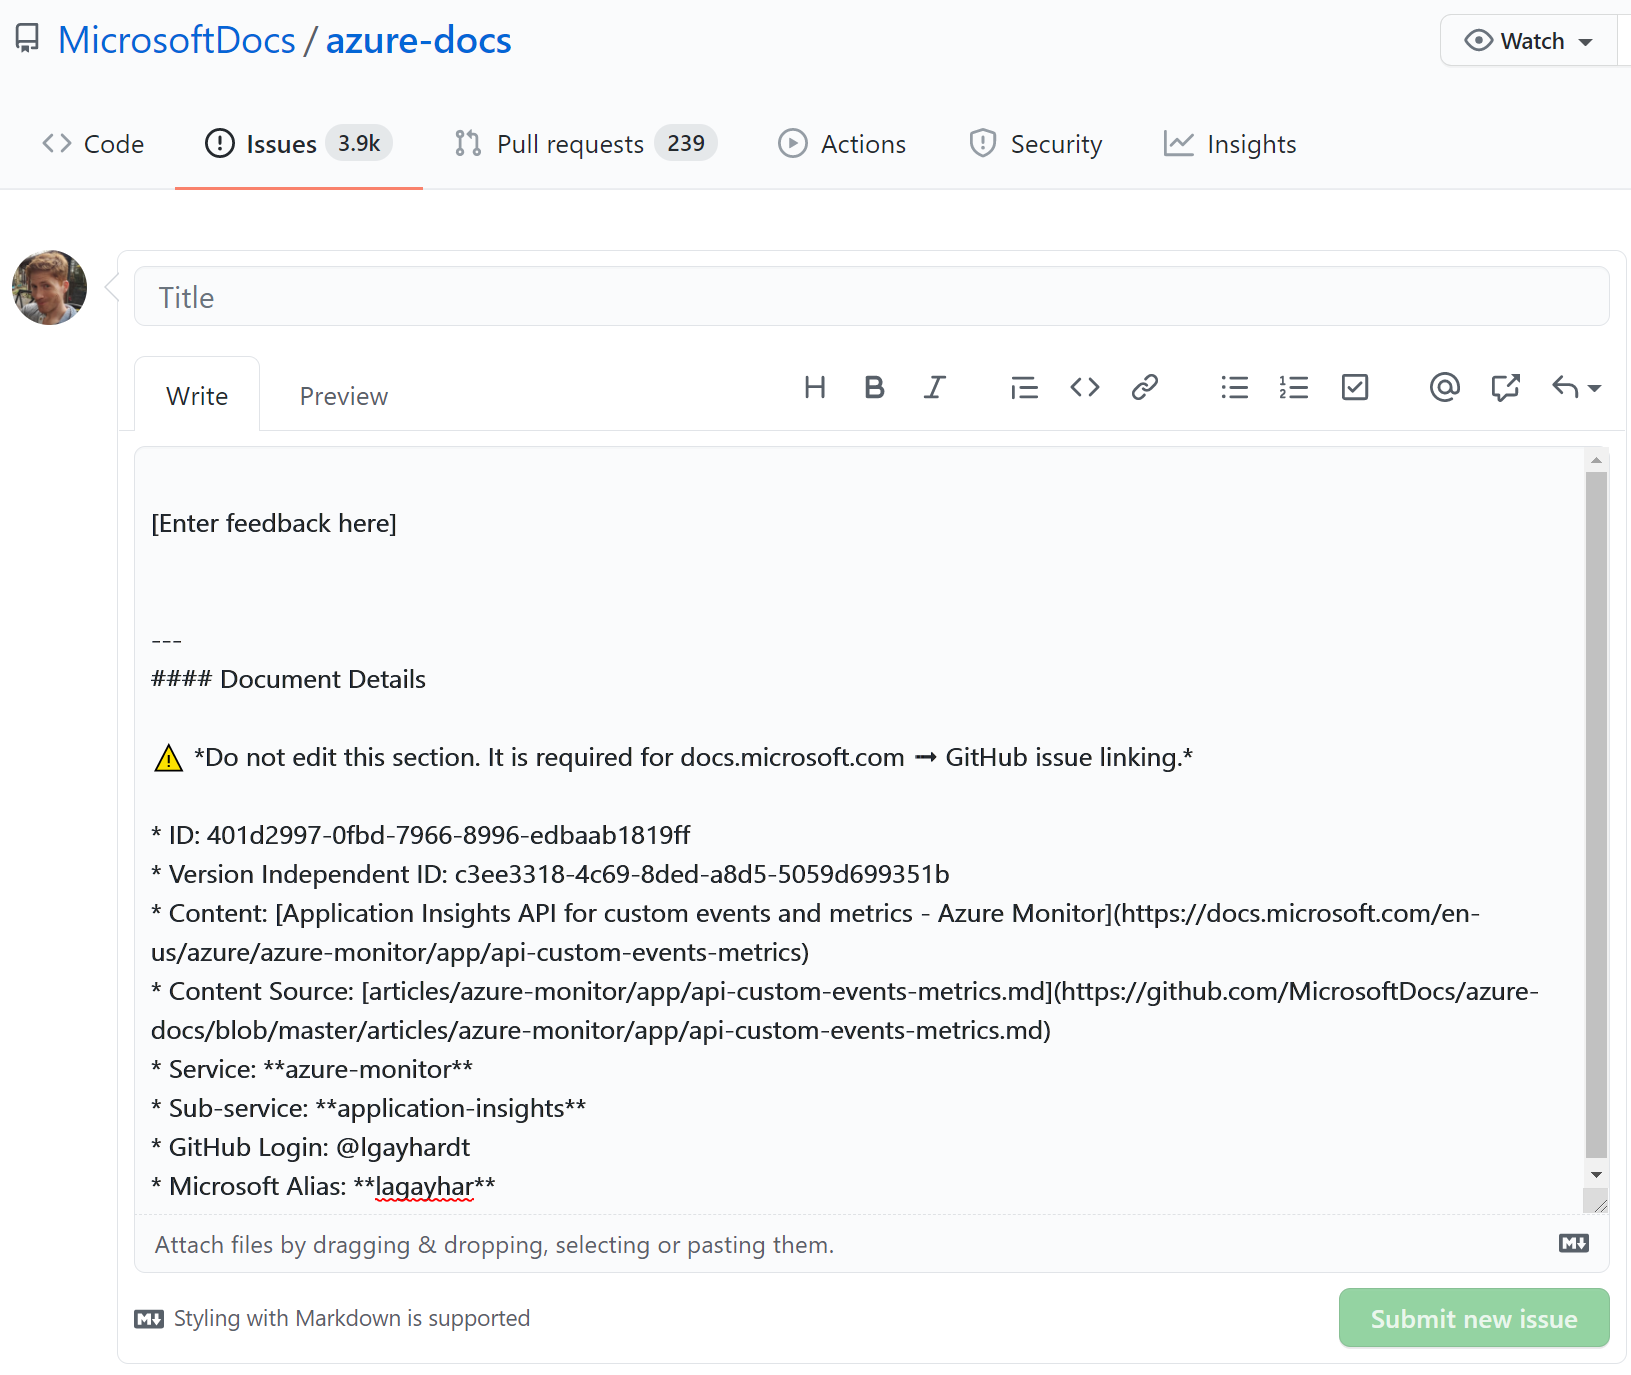
This implementation is great, because it automagically includes a lot of info about the post including which specific URL they viewed and also a link to the source file, so the dev or whoever isn’t left wondering what the heck the person is talking about.
I loved this and knew that I with me hosting my new blog on GitHub pages, I wanted to rely on GitHub Issues as well to keep track of needed changes and feedback.
OK, I’m sold, let’s make one!
The first thing I did was right-click and inspect element to get a clue as to how this button works. This revealed that it looks like you can do a lot with simple URL encoded values to set things like the Issue Title and prefill Issue Comments.
https://github.com/MicrosoftDocs/azure-docs/ #githubRepo
issues/new? #Issues / new
title=& #/No title but it looks like thats an option body=...
And with a little HTML decode on the body, we can see that it translates into exactly what you see in the body when click ‘Report Issue’
[Enter feedback here]


---
#### Document Details

⚠ *Do not edit this section. It is required for docs.microsoft.com ➟ GitHub issue linking.*

* ID: 401d2997-0fbd-7966-8996-edbaab1819ff
* Version Independent ID: c3ee3318-4c69-8ded-a8d5-5059d699351b
* Content: [Application Insights API for custom events and metrics - Azure Monitor](https://docs.microsoft.com/en-us/azure/azure-monitor/app/api-custom-events-metrics)
* Content Source: [articles/azure-monitor/app/api-custom-events-metrics.md](https://github.com/MicrosoftDocs/azure-docs/blob/master/articles/azure-monitor/app/api-custom-events-metrics.md)
* Service: **azure-monitor**
* Sub-service: **application-insights**
* GitHub Login: @lgayhardt
* Microsoft Alias: **lagayhar**
Now, I liked some of those fields but I didn’t need all of them, so I trimmed down to just these fields.
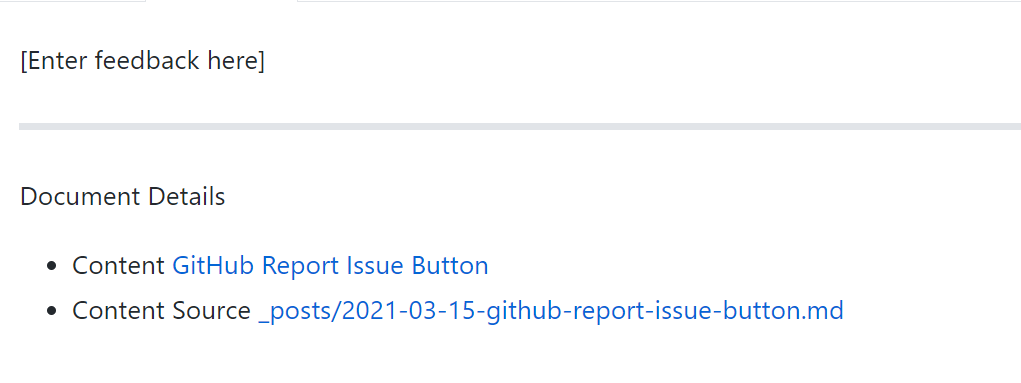
[Enter feedback here]

---
Document Details

- Content  [GitHub Report Issue Button](https://1redone.github.io//blog/github-report-issue-button.html)
- Content Source  [_posts/2021-03-15-github-report-issue-button.md](https://github.com/1RedOne/1RedOne.Github.io/blob/master/_posts/2021-03-15-github-report-issue-button.md)
The content and Content Source items are MarkDown Links, using the Jekyll Liquid Tags of page.title and page.path to autofill those values. This will help me see which URL someone was viewing and also what file that correlates to in the GitHub repo as well.
Next, to test the results I just pasted this into some random blog post and fired it up in Jekyll to see the result.
It works! It has both a working Content link, to show me where they clicked from, and the file path so I can edit the post too.
Now I just need to HTML Encode this body and make it into a clickable button.
URL Encoding and you
Do enough web dev work and eventually you won’t see %20 anymore, but automatically interpet it as a space. That’s the power of URL encoding. And of the human brain!
The easiest way to do this in a human readable form is to make a variable in JavaScript with the plain text, and then call encodeURI and let JS do it all for me.
<div class="alert alert-info" role="alert">
<i>See an Issue with this page? Report it on Github Automatically!</i><br>
<button class="button" id='GitHubButton'>
<i class="fab fa-github fa-lg fa-pull-left"></i> Report Issue
</button>
</div>
<script>
function MakeLink(){
var urlToEncode = `https://github.com/1RedOne/1RedOne.Github.io/issues/new?title=BlogPostIssue&body=
[Enter feedback here]
---
Document Details
- Content [GitHub Report Issue Button](https://1redone.github.io//blog/github-report-issue-button.html)
- Content Source [_posts/2021-03-15-github-report-issue-button.md](https://github.com/1RedOne/1RedOne.Github.io/blob/master/_posts/2021-03-15-github-report-issue-button.md)
`;
return encodeURI(urlToEncode);
}
var gitHubURL = MakeLink();
console.log("setting button for " + gitHubURL);
var item = document.getElementById("GitHubButton");
item.onclick = function(){window.open(gitHubURL);}
</script>
Then I added this manually to a page, refreshed Jekyll…and what did I see?
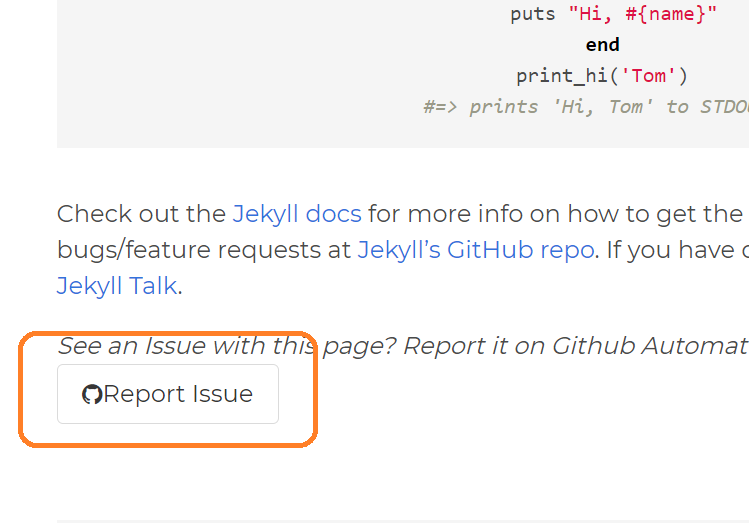
It was that easy! Now, I could go paste this into every single post I ever wrote, but I am a bit lazier than that…
How to make it into a snippet
Much like basically any other web framework (what an astute statement, Stephen) Jekyll supports saving common UI elements as a snippet which can be included and embedded wherever you like, making the perfect composited UI.
All you do is make a new html file and drop it into your ./includes folder and you’ll be good to go.
I took this chance to spruce up the button into a full modal element.

Automatically adding it below posts in Jekyll
Adding this snippet automatically is super easy. With it saved in the ./includes folder, we can then reference it within any page manually by using this syntax.
`{`% include gitHubLink.html `%`}
Remove the backticks!
So now our final step is to add this to our default post.html layout, which will be found in the layouts folder.
Merge the new include statement here after post content.
And then after a Jekyll Rebuild, it should appear beneath your posts!


