

The quest for true silent MDM Enrollment
If you’ve been reading my blog recently, you’ve seen a lot of posts about MDM and Provisioning Options for Windows 10. Previously we’ve covered:
- Automation options for a totally silent deployment with provisioning packages in Hands-off deployments
- A deep dive into how the Provisioning Package PowerShell Module works in PowerShell Deconstructed
And in this post we will dig further into the options available to us to deploy a Provisioning Package with the goal of allowing for silent MDM Enrollment and Silent application of a provisioning package!
Why are we doing this?
In my situation, my customer is deploying Win10 Devices managed with Air-Watch in order to use the native Windows 10 MDM client, but we need an easy way to enroll them into Air-Watch when they boot!
You can use the Windows Image Configuration Designer tool to capture all of the settings needed to enroll a device, then bake them into a Provisioning Package which an end-user can double-click and and enroll after a short prompt.
However, for our purposes, devices arrive built and ready for service at our endpoints, so we needed to examine other approaches to find a path to truly silent enrollment!
Prerequisites
First things first, you’ll need to be signed up for an MDM Service. In this guide I’ll assume you’re signed up for Air-Watch already (I’ll update it later with InTune once I am able to get this working as well)
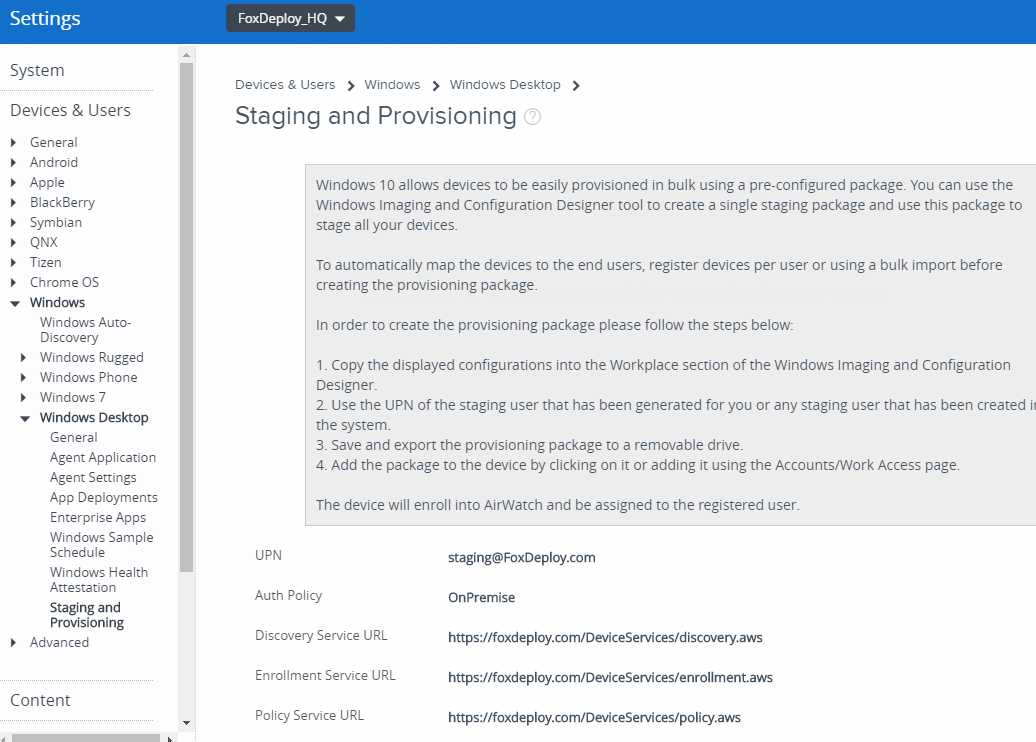
From the Air-Watch console, browse to Settings \ Devices \ Windows \ Windows Desktop \ Staging & Provisioning. You’ll see the necessary URLs.
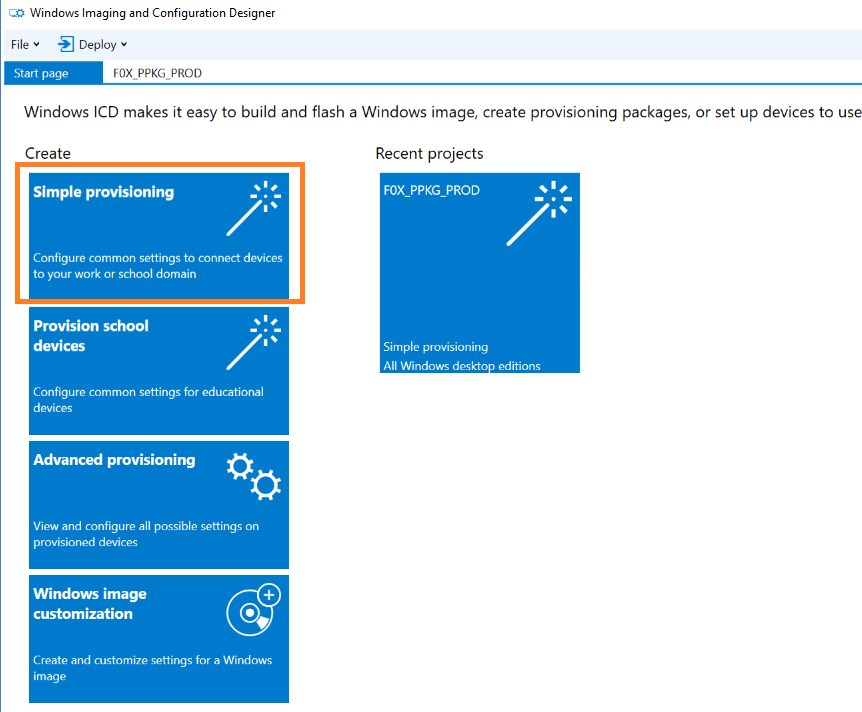
Make note of these and fire up Windows Imaging Configuration Designer. You can obtain this via the Windows Store on Windows 1703 or higher🔗 . It also ships as part of the Windows ADK as well, and if you want to bake a Provisioning Package into a Windows Image, you’ll need that.
Click ‘New Simple Provisioning Package’ and provide a name for this project.
This screen gives you a nice taste of some of the things you can do in a PPKG, but we are going to be digging deeper into the options, so click ‘Switch to Advanced Editor’
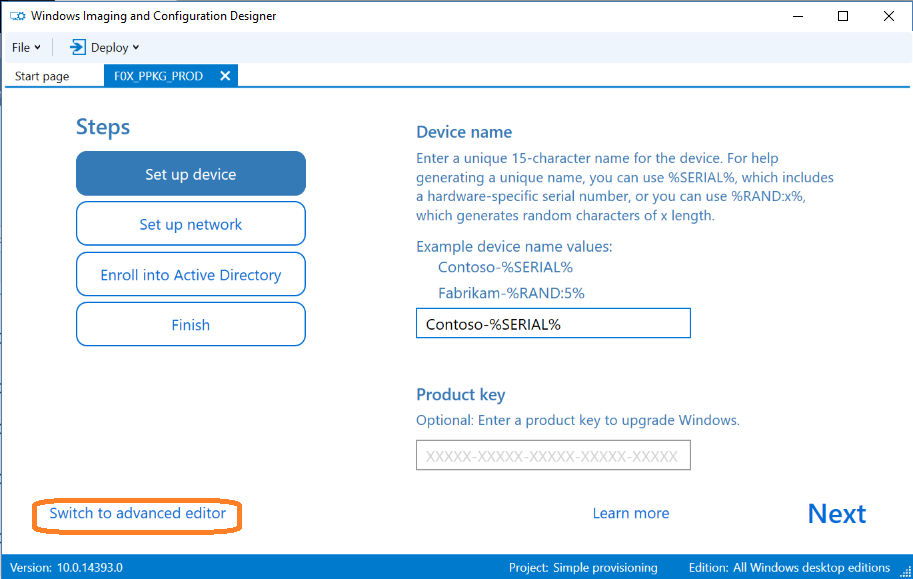
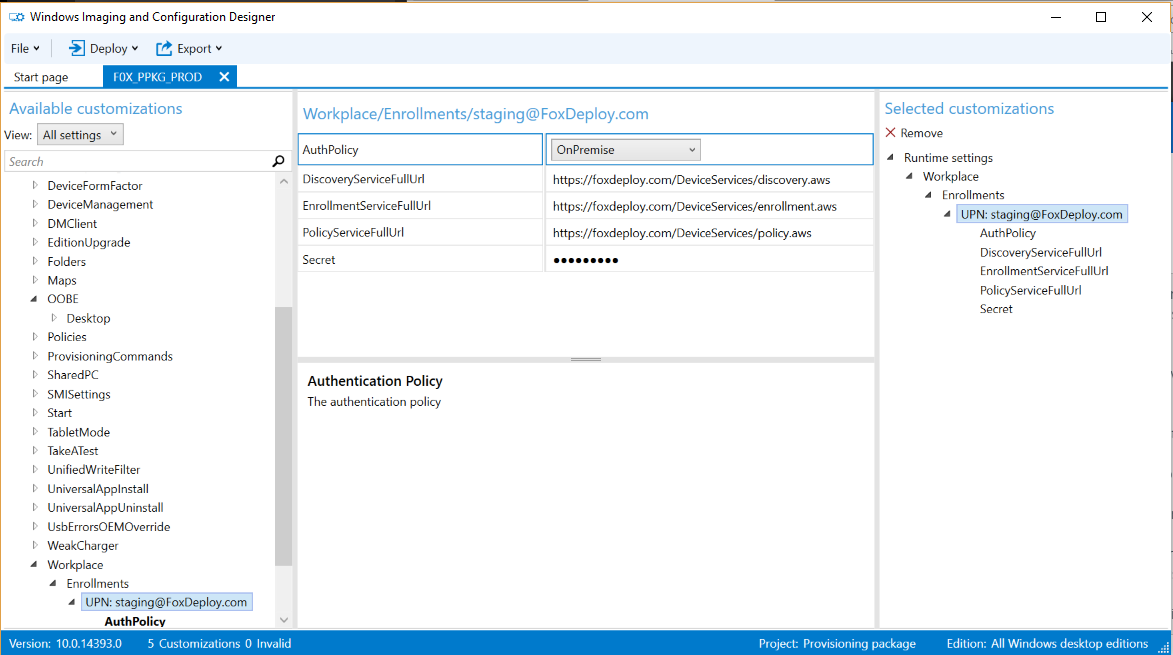
Click ‘All Settings’ under Available Customizations at the top, then scroll down to Runtime Settings \ Workplace \ Enrollments
Fill this in with the info we noted from the AirWatch screen earlier.
At this point, we’re ready to export the Provisioning Package and think about our options for distribution.
Click Export, then Provisioning Package.

For now, we can Next, Next, Finish through the wizard.
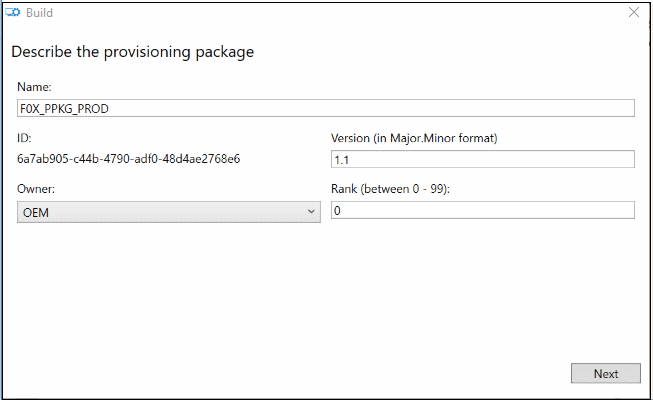
and the output is two files, a .PPKG and a .CAT file. The Cat is a Security Catalog file, which is a management artifact which contains signatures for one or many files.

For 99% of your PPKG needs, you don’t need to worry about the .CAT file, just deploy the PPKG file and away you go.
How to distribute Provisioning Packages
We have a number of ways we can distribute this file, but this cool thing about it is that once invoked, the user is going to get automatically enrolled into MDM Management! Here are our options, which we’ll cover for the rest of the post:
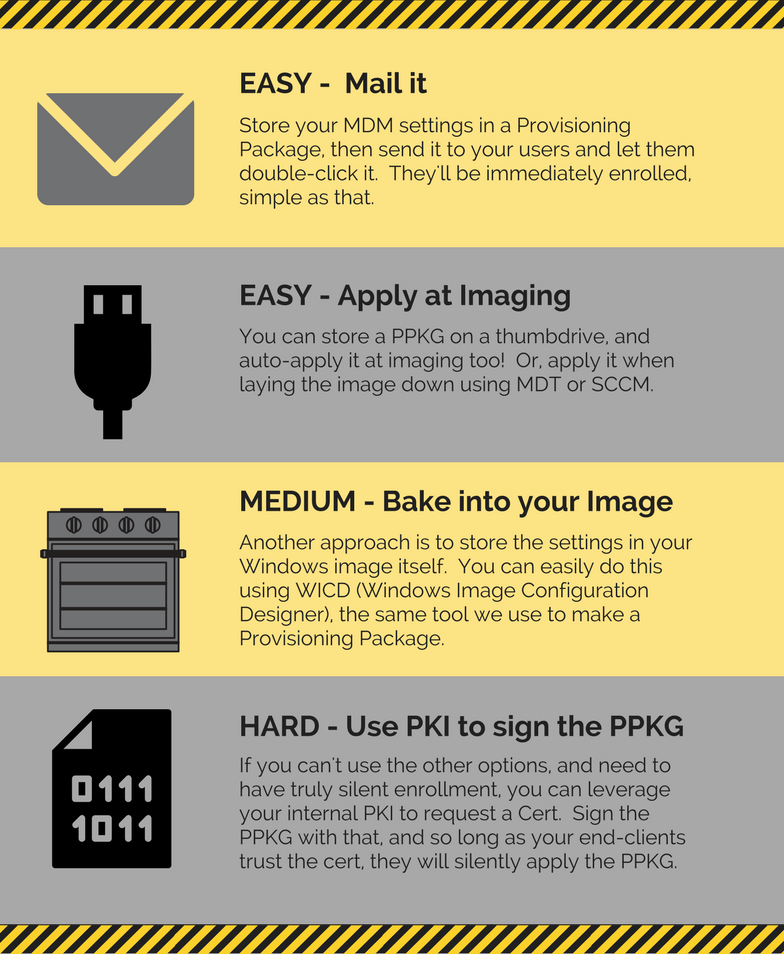
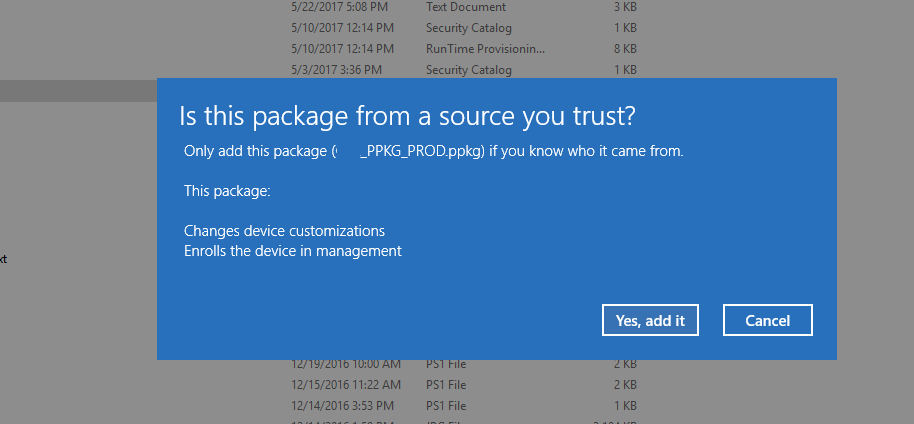
EASY - Send to Users
If you’re in a normal environment with users able to follow basic instructions (big assumption :) ) you can just e-mail the PPKG file out to your end users and instruct them to double-click it. They’ll be presented with the following prompt, which will enroll them in MDM and along they go.
However for my purposes, this wasn’t a viable option. We’d heard about automatic provisioning being available at image time, so we decided to take a look into that approach.
Apply at OOBE
If you’re not familiar with the term, OOBE is the Out-Of-Box-Experience. It’s a part of Windows Setup and can be thought of as the ‘Getting Devices Ready’ and Blue-background section of OS install, in which the user is asked to provide their name, password, etc.
Well, it turns out that if the PPKG file is present on the root of a Flash Drive or any volume during OOBE, the user will be automatically triggered and prompted to accept the package!
Protip: If your PPKG isn’t automatically invoked, hit the Windows Key Five times when at the ‘Let’s Pick a Region’ Screen.
However, this STILL requires someone to do something…and assumes we’ll have a keyboard attached to our systems. This would be good for schools or other ‘light-touch’ scenarios, but was a non-starter for me, onto the next approach.
Bake into Image
You can also just bake all of your Provisioning Settings directly into an image too. Going back to WICD you can choose ‘Export Production Media’ and follow the wizard, which will create a .WIM file structure. You can then deploy that with MDT, SCCM or (ugh) ImageX. However, if you want to convert this into a .WIM file, follow Johan’s wonderful guide to the topic here.
http://deploymentresearch.com/Research/Post/495/Beyond-Basic-Windows-10-Provisioning-Packages
Pro-tip: Note that in the PowerShell example there, you’ll need to change line 19 to match the desired path you specify in line 3.
If you have access to your hardware while imaging, this is a great strategy. You could even use the ‘Apply Provisioning Package’ step as an alternative method to enroll devices.
Truly Silent Deployment - Signed PPKGs
Finally, the real reason for this post. We order customized hardware from a vendor tailored for our needs but couldn’t use any of the methods covered here. However…we CAN leverage a PKI instead.
Note: For ease of testing, this guide will cover using a Self-Signed Certificate instead. However, you can easily do this using an internal Public Key Infrastructure if you have one available.
To outline what we’ll do here:
- On WICD Workstation
- Create a Code-Signing Cert
- Move a copy of it into your Trusted Root Cert Authorities
- Export a .cer copy of the cert
- Sign your PPKG
- On Base image or on each computer
- Import .cer file into Trusted Root Cert Authority
- Move copy into Trusted Provisioners Store
- Execute the PPKG, which will run silently
GIANT DISCLAIMER: This approach is VERY tricky and has a lot of moving parts. It’s easy to get wrong and has been mostly replaced by a new PowerShell Module titled ‘Provisioning’ which ships with Windows 10 1703 (Creators update ) release. This cmdlet makes it a snap!
`Install-ProvisioningPackage -QuietInstall`
If you have that module / option available, you are advised to use it instead of the Signed PPKG approach.
Are you still here with me? Then you’re my kinda coder!
On our PPKG Creation Computer
First, let’s create a new CodeSigning Certificate, then export a .cer version of it, which we reimport into Trusted Root Cert Authorities. We’re doing these steps on the workstation where we build our Provisioning Packages.
$NewCert = New-SelfSignedCertificate -DnsName 101Code.FoxDeploy.com -Type CodeSigning -CertStoreLocation Cert:\\CurrentUser\\My

#Export the cert $NewCert | Export-Certificate -FilePath c:\\temp\\DistributeMe.cer

#Reimport to Trusted Root Cert Authorities Import-Certificate -FilePath C:\\temp\\DistributeMe.cer -CertStoreLocation Cert:\\CurrentUser\\Root
You’ll see this prompt appear, asking if you’re really super sure you want to add a new Trusted Root Certificate Authority. Say Yes.

With these steps done, fire up WICD again and go to Export Provisioning Package.
Provide a name and Version Number like normal and hit next. The video below guides us through the rest.
Talking through that, in the next page, choose the Certificate to sign it. This needs to be the same cert that will be trusted on your end computers as well. If you don’t see your cert listed, make sure (for Self-Signed) that it’s also in your Trusted Root Cert Authority. If you’re using PKI, be sure you have an authorized Server Auth or Code Signing Cert present from a CA that your computer trusts.
Copy the .cat and .PPKG file. Yep, we must have the .CAT file this time, don’t forget it.
Preparing the image
Now, for our end-user actions. There are a lot of ways to do this but the easiest way to do it is in your Windows Image before capturing it.
Take the cert we created earlier called DistributeMe.cer and push this out to your end computers. You need to import this Into the Trusted Root Cert Authority & the hidden Trusted Provisioners Cert store, which is ONLY available via PowerShell and NOT the Certificate Manager snapin.
Function Add-TrustedProvisioner { Param (\[String\]$Path) Import-Certificate -FilePath $path -CertStoreLocation Cert:\\LocalMachine\\Trust | Out-Null $Cert = Import-Certificate -FilePath $Path -CertStoreLocation Cert:\\LocalMachine\\My $Thumbprint = $Cert.Thumbprint New-Item HKLM:\\SOFTWARE\\Microsoft\\Provisioning\\TrustedProvisioners\\ -name Certificates -ErrorAction Ignore | Out-Null New-Item HKLM:\\SOFTWARE\\Microsoft\\Provisioning\\TrustedProvisioners\\Certificates\\ -name $Thumbprint -ErrorAction Ignore | Out-Null Copy-ItemProperty "HKLM:\\SOFTWARE\\Microsoft\\SystemCertificates\\MY\\Certificates\\$Thumbprint" -Destination "HKLM:\\SOFTWARE\\Microsoft\\Provisioning\\TrustedProvisioners\\Certificates\\$Thumbprint" -Name blob Remove-Item Cert:\\LocalMachine\\My\\$thumbprint }

Add-TrustedProvisioner C:\\Temp\\DistributeMe.cer

Import-Certificate -FilePath C:\\temp\\DistributeMe.cer -CertStoreLocation Cert:\\LocalMachine\\Root
Now, you can run SysPrep or otherwise capture this image, and the changes will persist. You could also run these steps by running a PowerShell script with SCCM, MDT, GPO or whatever you want.
With all of these steps in place, check out what happens when you invoke the Provisioning Package now!
End Result
Conclusion
Of course, in the cosmic ironies of the universe, the same week I worked through how to get Silent Enrollment working…AirWatch released a brand new .MSI based enrollment option which installs the AirWatch agent and handles all enrollment for you…but I thought that this must be documented for posterity.
Big, big thanks go to Microsoft’s Mark Kruger in the Enterprise Security R&D Team. Without his advice, I would never have been able to get this working, so thanks to him!


