

Building a Windows 10 IoT C# traffic monitor: Part II

This post is part of the Learning Windows IoT Toolmaking Series, here on FoxDeploy. Click the banner to return to the series jump page!

Previously 🔗, we took off our socks and put our feet into the sand, and wrote our first C# Console application. We built on it and added the ability to complete a web request and even parsed some JSON as well! Along the way, we learned a bit of how things work in C# and some background on programming terms and functionality.
In this post, we will take our code and port it over to run on .net core, and hook up the results to the GUI. Stick with me here, and by the end you’ll have a framework you can modify to list your Twitter followers, your Facebook Feed, or monitor your own blog stats as well.
And if you do modify it…
Then share it! You’ll find a “LookWhatIbuilt” folder in the repository. You are encouraged to share screenshots, snippets, even your own whole project if you like, by sending a PR. Once we have a few of these, we’ll do a Spotlight post highlighting some of the cool things people are doing,
Cracking open the IoTDefaultApp
When we imaged our rPi with the Iot Dashboard, it wrote the OS and also delivered the ‘IoT Core Default App’ to the device. It’s pretty slick looking and gives us a very good jumping off point to reskin things and have our app look nice. We can view the code for the 🔗 Default App here on the MS IoT GitHub .
Since this is ‘babies first application’ we are going to modify this existing app to suit our purposes. Download the sample from the link above and then double-click the Visual Studio Project .SLN file. There’s kind of a lot going on when you first open it, but the file we want to edit is MainPage.XAML.
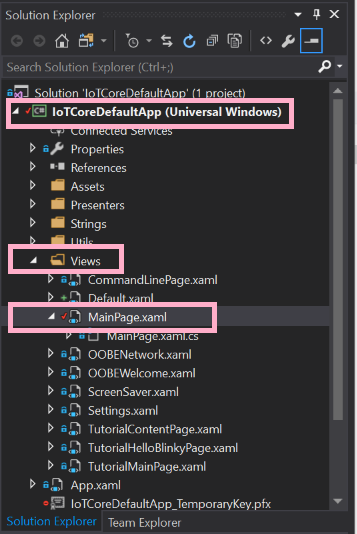
Over in the Solution Explorer in the right-gutter, expand out to IotCoreDefaultApp \ Views then click MainPage.xaml.
Here is the template we’re going to be modifying.
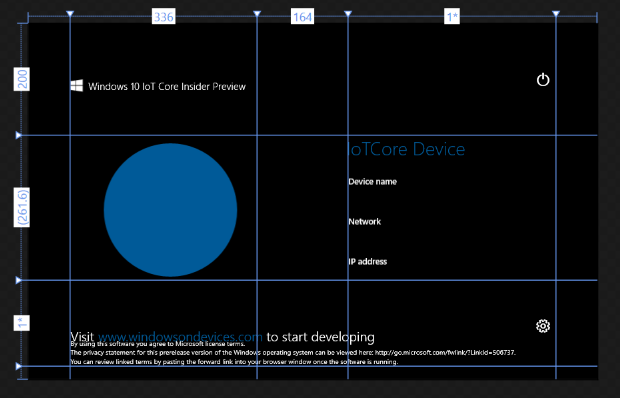
There’s kind of a lot going on here too, so I recommend that you power on your Pi now and see what the default app looks like, here’s a screen shot…
Redecorating the app
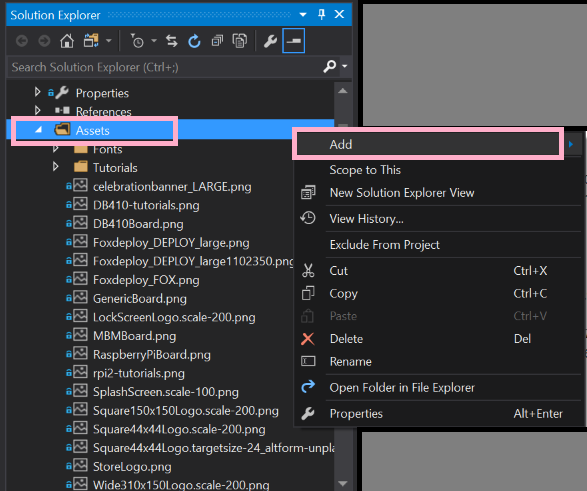
Me being me, of course I’m going to make it look pretty before I make it work, so I spent some time adding files, dragging the layout around, that sort of thing. To add a new file, first, click to the Solution Explorer \ Assets folder, then right-click and choose ‘Add Existing Item’
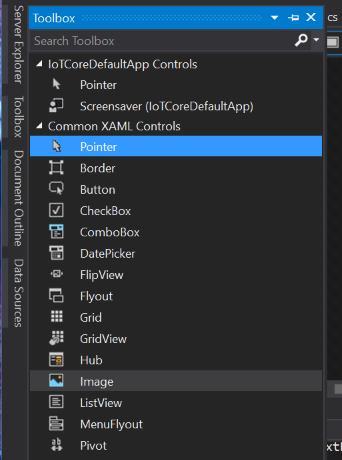
Next, go to the Left Gutter \ Toolbox\ and choose the Image Control, then drag the area you’d like your image to appear.
Now, back on the Right Gutter \ Properties \ Common, use the dropdown box Source and pick your image.
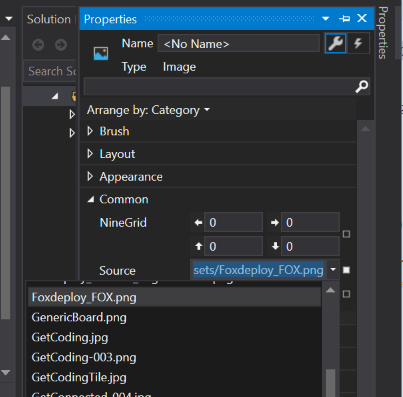
PROTIP: be sure to use this process of adding an image, relatively selecting it, rather than specifying the full-path to the file.
If you don’t, you can end up with the file not getting delivered with the app to your pi. Not good!
I did a little bit of tweaking here, and here is where I ended up
One of the core values of my job is to Make it work before you make it look pretty. It really speaks to me, namely because I never do it.
We made it look pretty, now, to make it work
Hitting F7, or right-clicking and choosing ‘View Code’ will show the c# behind this View. Developers like to call the code behind a view the code-behind.
We see here a whole lot of references to assemblies
using IoTCoreDefaultApp.Utils;
using System;
using System.Globalization;
using System.IO;
using System.Net;
using System.Net.Http;
using Windows.Data.Json;
using Windows.Networking.Connectivity;
using Windows.Storage;
using Windows.System;
using Windows.UI.Core;
using Windows.UI.Xaml;
using Windows.UI.Xaml.Controls;
using Windows.UI.Xaml.Media.Imaging;
using Windows.UI.Xaml.Navigation;
using MyClasses;
using Windows.System.Threading;
Then we define a namespace for our app, called IotCoreDefaultApp, then a class called a MainPage, which is where the entirety of the code for this app will live. We also define a Dispatcher, which might be familiar from our post on 🔗multi-threaded GUIs with PowerShell. Because our GUI is going to be multithreaded, we can’t just say Label.Text = "New Value", we’ll use a Dispatcher to enact the change for us.
namespace IotCoreDefaultApp {
  public sealed partial class MainPage: Page {
      public static MainPage Current;
      private CoreDispatcher MainPageDispatcher;
      private DispatcherTimer timer;
      private DispatcherTimer GetStattimer;
      private DispatcherTimer countdown;
      private ThreadPoolTimer timerInt;
      private ConnectedDevicePresenter connectedDevicePresenter;

      public CoreDispatcher UIThreadDispatcher {
        get {
          return MainPageDispatcher;
        }

        set {
          MainPageDispatcher = value;
        }
      }
Next a public class called MainPage() gets defined, which kicks off some interval timers which run, um, on an interval and update UI info. We’ll skip over some boring stuff (which you can read here 🔗) ,which consists of kind of boring house-keeping functions of this app. Most of these run when something is clicked, or when a timer interval counts down.
Within the timer, (beginning line 65 or so) you’ll see that it gets started, then counts down 20 seconds and calls a function called timer_Tick. All we have to do is define our own method, and then add it to timer_Tick and bam, it will automatically run on the interval specified (20 seconds, in this sample).
timer = new DispatcherTimer();
timer.Tick += timer\ _Tick;
timer.Interval = TimeSpan.FromSeconds(20);

this.Loaded += async (sender, e) => {
  await MainPageDispatcher.RunAsync(CoreDispatcherPriority.Low, () => {
    UpdateBoardInfo();
    UpdateNetworkInfo();
    UpdateDateTime();
    UpdateConnectedDevices();
    timer.Start();
  });
};
this.Unloaded += (sender, e) => {
  timer.Stop();
};
}
Let’s see what else happens when timer_Tick get’s called. Double-click timer_Tick and choose ‘Go to Definition’ to jump there.
private void timer\_Tick(object sender, object e) { UpdateDateTime();

}
So, every 20 seconds, it runs and calls UpdateDateTime(), care to guess what this function does?
Now, that we’re familiar with how this works so far, let’s make our own method.
Making our own Method
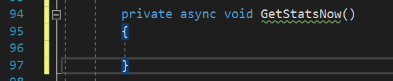
I found a nice innocuous spot to add my method, in between two other methods and started typing.
I’m defining this as a private method, meaning that only this body of code can use it. Next, because performing a web request can take a few seconds to complete, and we don’t want the code to lockup and freeze here, we add the async modifier. Finally, we add void because this code block will run the web request and update the UI, but doesn’t return a value otherwise.
A word on Async and Await
We want our code to be responsive, and we definitely don’t want the UI to hang and crash, so running things asynchronously is a necessity. We can do that using c#’s state machine (more on that here) to ensure that the app will not hang waiting for a slow web request
When you define a method as asynchronous, you also have to specify an
awaitstatement somewhere, to identify which code is allowed to run asynchronously while the rest of the app keeps running.
Now, let’s copy and paste the code we had working previously in the last post into the method and see if we get any squiggles.
Copying and Pasting our old code…why doesn’t it work?
We will have some squiggles here because we are bringing code from a full-fledged .net app and now targetting .net Core. Core is cool…but it’s only got some of the features of full .net. Some stuff just won’t work. I am on a mission to kill these red squiggles.
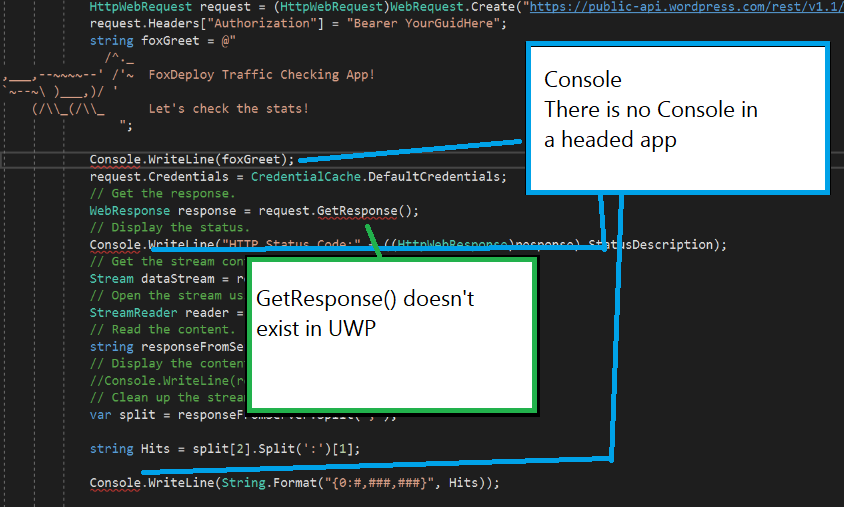
First off, we don’t have a Console to write off to, so lets comment out or delete those lines( the double-frontslash // is used to comment in c#).
Next, the HttpWebRequest class doesn’t offer the GetResponse() method when we target .Net Core for Universal Windows Apps.

Let’s delete GetResponse() and see if there is an alternative.
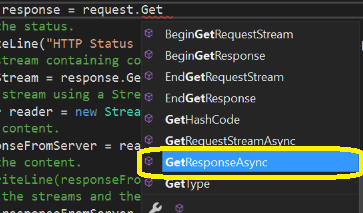
Now that I’ve swapped this for GetResponseAsync(), I get MORE squiggles. This time, the swiggles are because I’m telling the program to run this asynchronously and keep on going…but I don’t tell it to wait for the response anywhere.
The way to fix this is to add an await to the command as well. This makes sense too, because there is always going to be a slight delay when I run a web request. I want my app to know it can run this method we’re writing, and then proceed to do other things and come back when the webrequest has completed to finish the rest of my method.
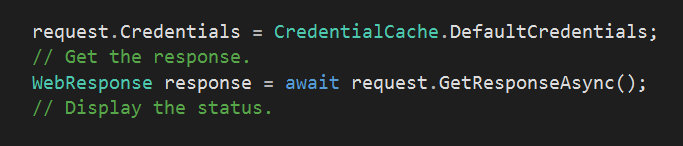
Yay, no more squiggles, time to actually run this badboy
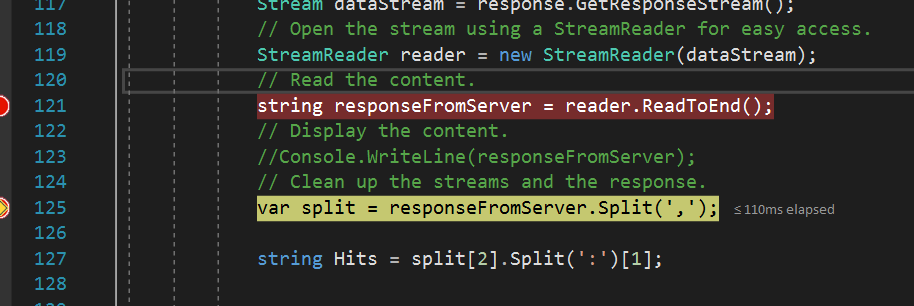
I’m going to want to test the results from this, so I’ll set a breakpoint within my Test() method, so that I can see the values and results when this code runs. I’m going to highlight this line and hit F9 to create a breakpoint, which will tell the debugger and my program to stop right here.
With all that done, I’ll add modify the timer_Tick method to have it call my code Test()
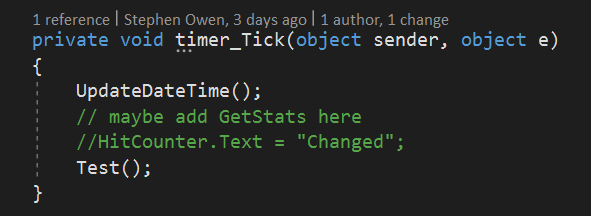
Once every twenty seconds, the timer will expire and it will both update the time, and call our new method!
Pushing code to the Raspberry Pi
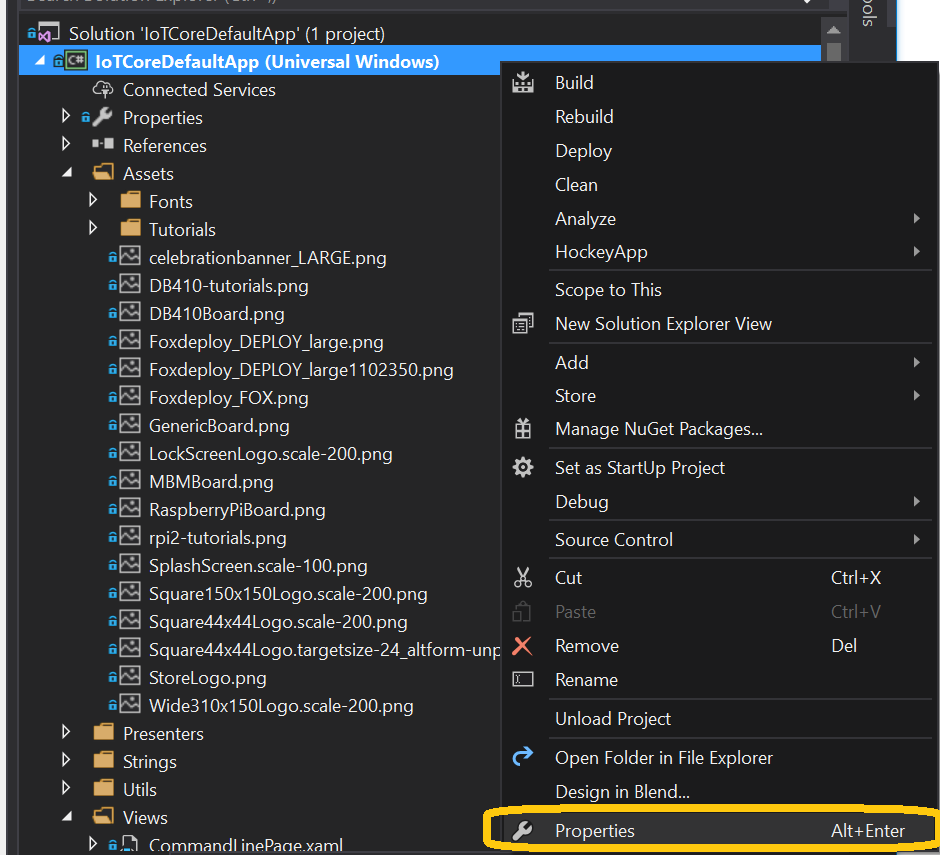
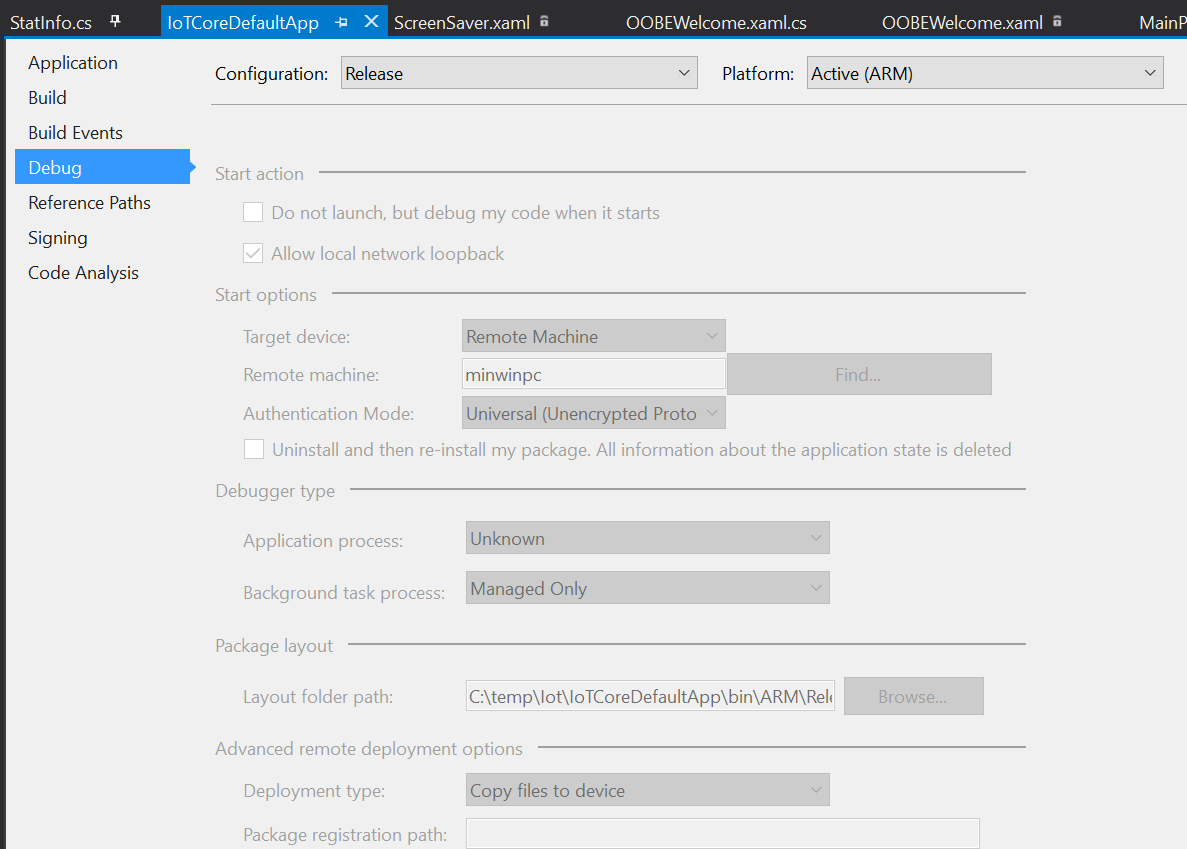
Pushing code to the Pi is easey peasey. In the Right Gutter \ Solution Explorer , right-click your project and choose Properties.
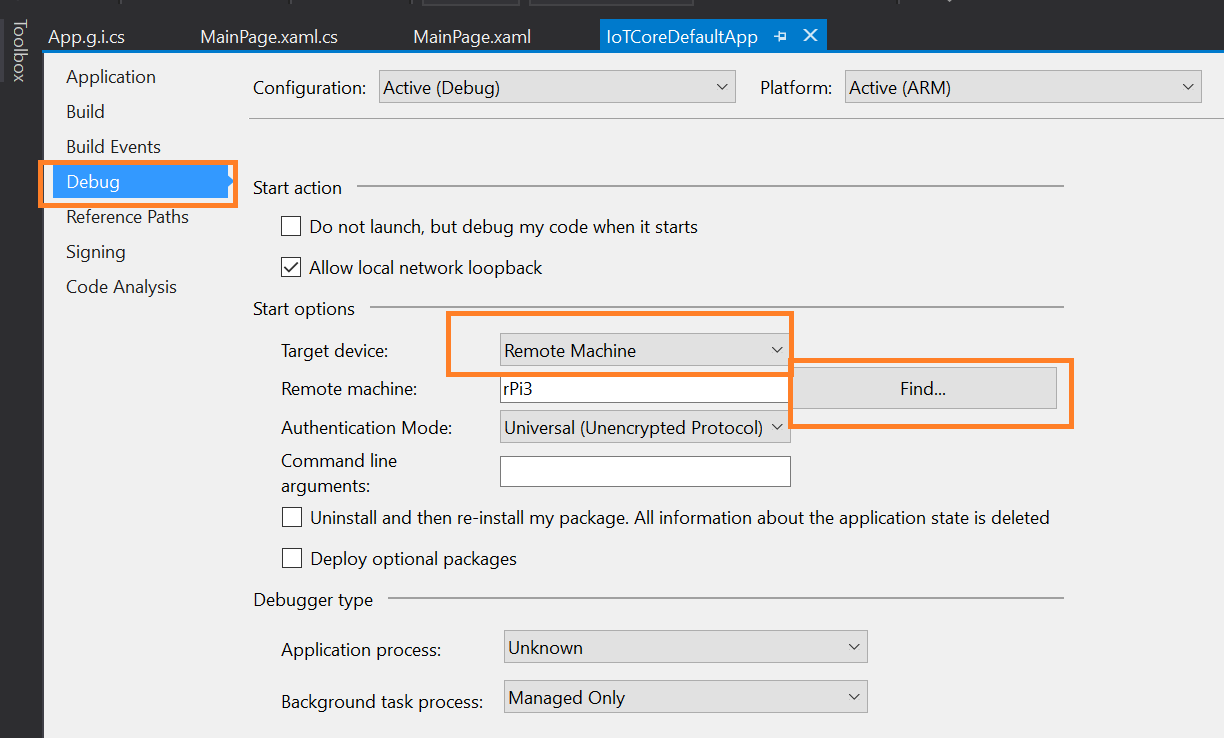
Next, click Debug then specify the Target Device as a Remote Machine. Then click Find
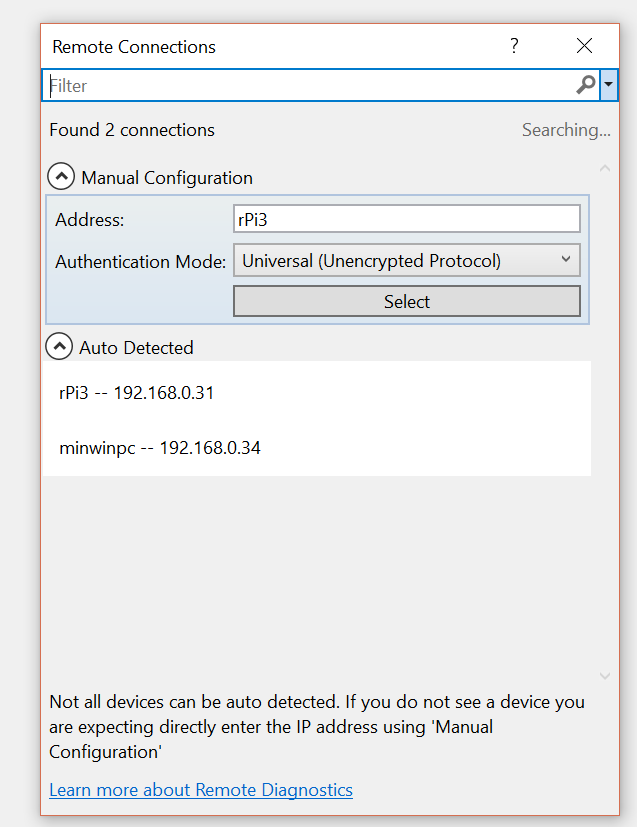
 Simply click your device and that’s it!
 You might not even be asked for credentials. Nope, I don’t know why it doesn’t need credentials…
Now, finally, hit F5!
You’ll see a kind of lengthy build process, as the first boot or two of a pi is really pretty slow. Then you’ll see a longggggggg Windows OOBE screeen displayed, which counts down and eventually picks the English language and Pacific Time Zone. You can change this later by plugging in a mouse and keyboard.
Download link: Our code at this point should look something like this🔗.
Live Debugging
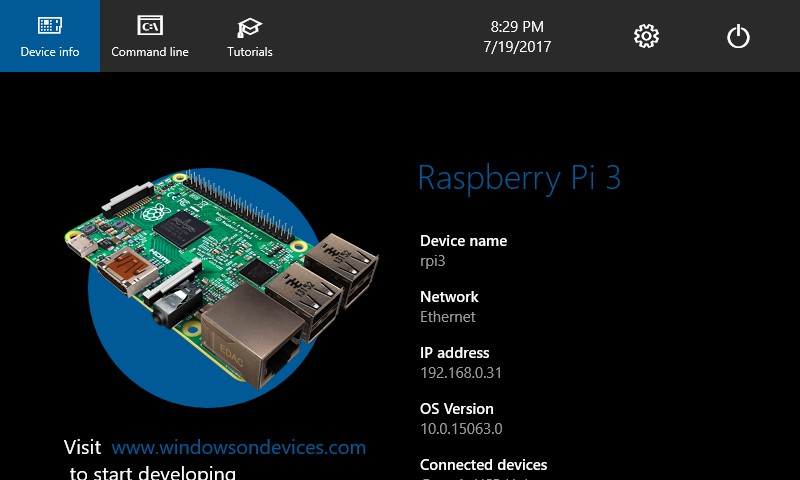
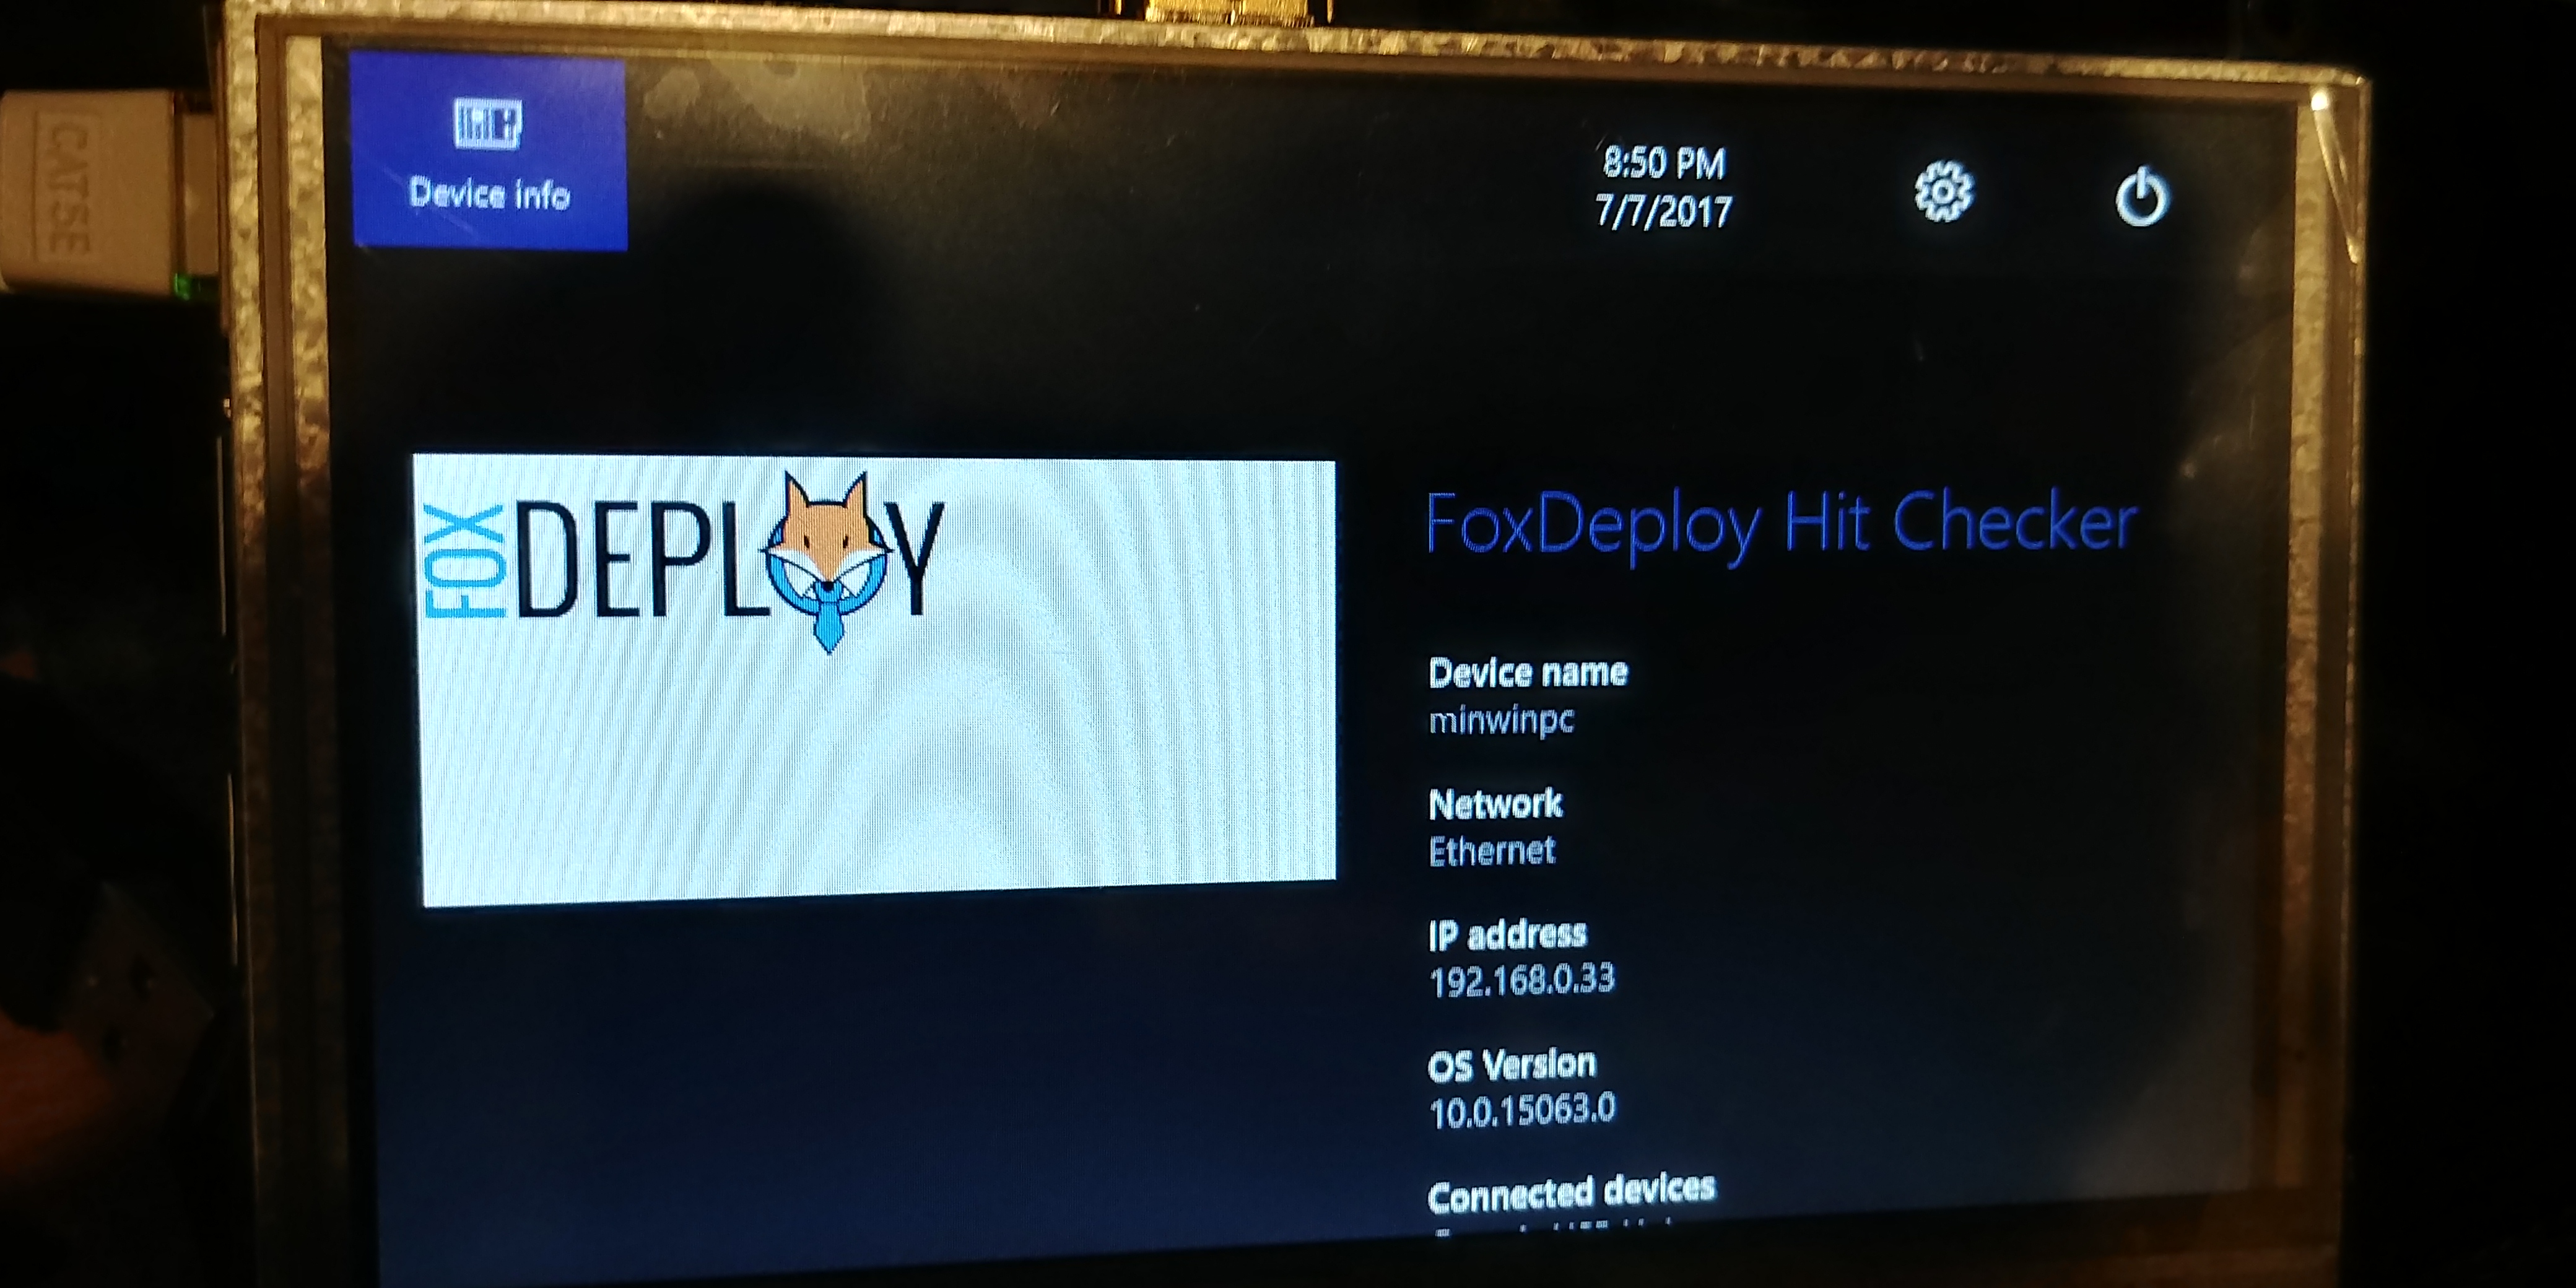
While our code is running, it will eventually swap over to the main page and display something along these lines.
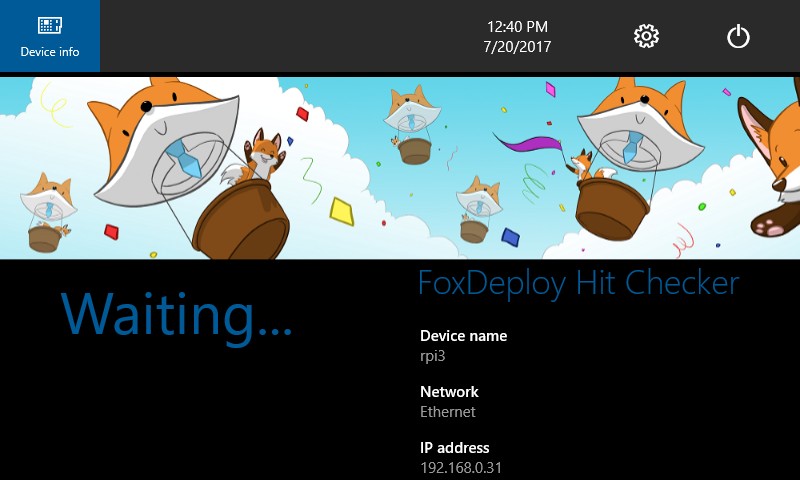
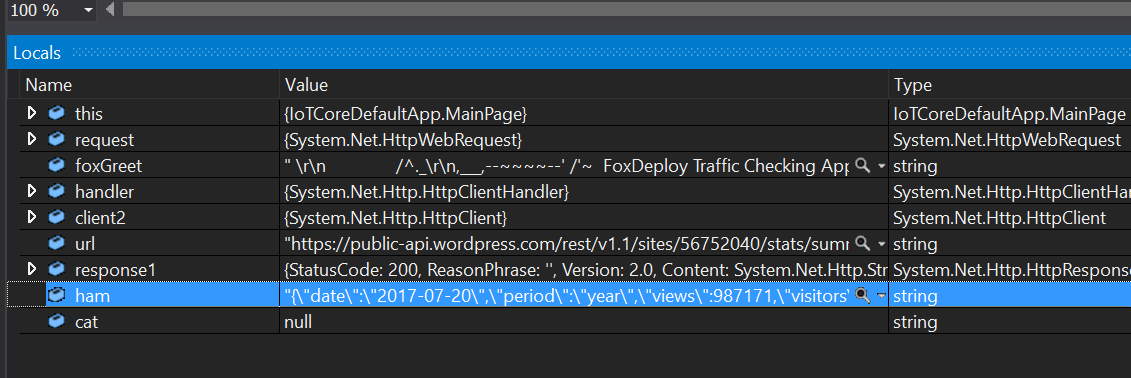
If we have Visual Studio in the foreground, the app will pause when it reaches our breakpoint and we can see the values for each variable, in real time!

So, it looks like our web request completed sucessfully, but somehow the responseFromServer value looks like garbage. Why might that be? Maybe HttpClient is different between full .net and .net core?
Spoiler warning: it is different.
We’re able to hit the endpoint, but then we get this gibberish.
�\b\0\0\0\0\0\0�\a`I�%&/m�{J�J��t�\b�`$ؐ@������iG#
Fortunately I recognized this Gibberish as looking kind of like what a GZipped payload looks like. See, all modern browsers support GZip as a pretty good style of compression. It’s so common that event Invoke-RestMethod and HttpClient just natively support it. However, in .net core it’s an option we have to turn on.
And we’ll do it by defining a net HttpClientHandler as a way of passing our preferences over to HttpClient when we spin up a new one. Here’s how to do it, thanks to this StackOverflow Answer.
HttpClientHandler handler = new HttpClientHandler()
{
    AutomaticDecompression = DecompressionMethods.GZip | DecompressionMethods.Deflate
};

using (var client = new HttpClient(handler))
{
    // your code
}
I simply move all of the HTTP code within the //your code space, like so.
private async void GetStats() {

  HttpClientHandler handler = new HttpClientHandler() {
    AutomaticDecompression = DecompressionMethods.GZip | DecompressionMethods.Deflate
  };

  using(var client2 = new HttpClient(handler)) { // your code string url = "https://public-api.wordpress.com/rest/v1.1/sites/56752040/stats/summary/?fields=views&period=year&num=5"; //client.DefaultRequestHeaders.Add(); client2.DefaultRequestHeaders.Add("Authorization", "Bearer YourKeyHere");

    HttpResponseMessage response1 = await client2.GetAsync(url);

    //assign the response to a variable called ham string ham = await response1.Content.ReadAsStringAsync();

  }

}
Running it again, I can see that the fix worked, and the response isn’t GZipped anymore!
But…well, crap, I can’t use JSON.net (or if it’s possible, I couldn’t figure it out). What am I going to do?!?1
Learning how to parse JSON, again
I hope I didn’t leave you hanging with that cliff hanger. Fortunately, dotnetCore has its own built-in JSON parser, under Windows.Data.JSON.
We can instantiate one of these badboys like this.
var Response = JsonObject.Parse(ham);
This will put it into a better and more parsable format, and store that in Response. The last step is to pull out the value we want.
In PowerShell, of course, we would just run $Views = $Response.Views and it would just work because PowerShell is Love.
In C#, and with Windows.Data.JSON, we have to pull out the value, like snatching victory from the jaws of defeat.
var Response = JsonObject.Parse(ham); var hits = Response.GetNamedValue("views").GetNumber();
Response.GetNamedValue("views") gives us the JSON representation of that property as in {1000}, while .GetNumber() strips off the JSON envelope and leaves our number in its unadorned natural form like so 1000.
I am FINALLY ready to update the text block.
Crashing the whole thing
I was a bright-eyed summer child, like I was before I started reading Game of Thrones, so I decided to happily just try to update the .Text property of my big fancy count-down timer like so:
var Response = JsonObject.Parse(ham); var hits = Response.GetNamedValue("views").GetNumber();

var cat = "Lyla"; //this was a breakpoint, named after my cat

HitCounter.Text = hits.ToString("N0");
I hit F5, waited, really thrilled to see the number change and…it crashed. The error message said
The calling thread cannot access this object because a different thread owns it.
This one was really puzzling, but this helpful StackPost post explains that it’s because the very nature of threading and asynchronous coding means that I can’t always expect to be able to change UI elements in real time.
Instead, we have to schedule the change, which is SUPER easy.
How to update UI from within a thread
I just modify the call above like so, which makes use of the Dispatcher to perform the update whenever the program is ready.
await MainPageDispatcher.RunAsync(CoreDispatcherPriority.Low, () => { //Move your UI changes into this area HitCounter.Text = hits.ToString("N0"); });
And now…it works.
Publishing the app and configuring Auto Start
When we’re finally done with the code (for now), publishing the finished version to the Pi is super easy. Right click the solution in the right-hand side and choose properties. In the windows that appears, go to the Debug tab and change the Configuration dropdown to Release.
 Change the configuration to Release, and then F5 one last time.
Once you do that, the app is written and configured to run without remote debug. Our little Raspberry is almost ready to run on it’s own!
The very last step here is ot configure our app to automatically run on power on. Since we fiddled with it so much, we’ll need to set this again. You can do this from the Windows IoT app by right-clicking the device and choosing Launch Windows Device Portal.
This launches a web console that is actually really slick.
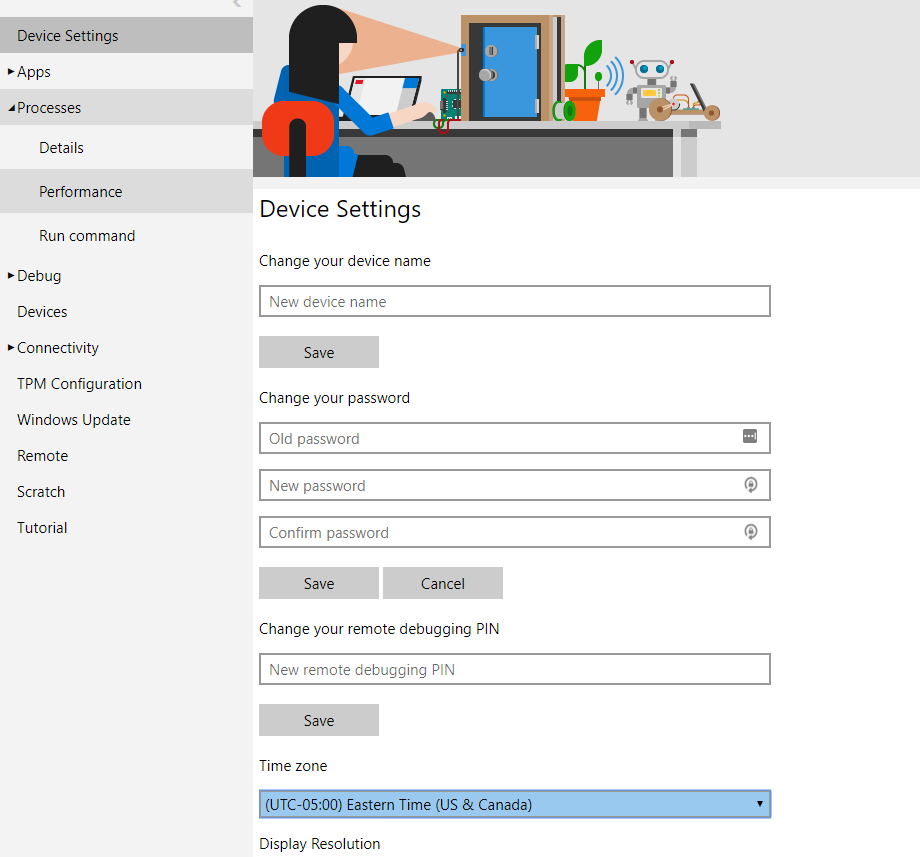
You can watch live performance graphs, launch apps, configure wifi and updates and change the time zone here as well. This is also where we configure which app launches when you turn the Pi on.
From this page, click Apps \ App Manager and find our app (you may have changed the name but I left it as IoTCoreDefaultApp)and then click the radio button for Startup.
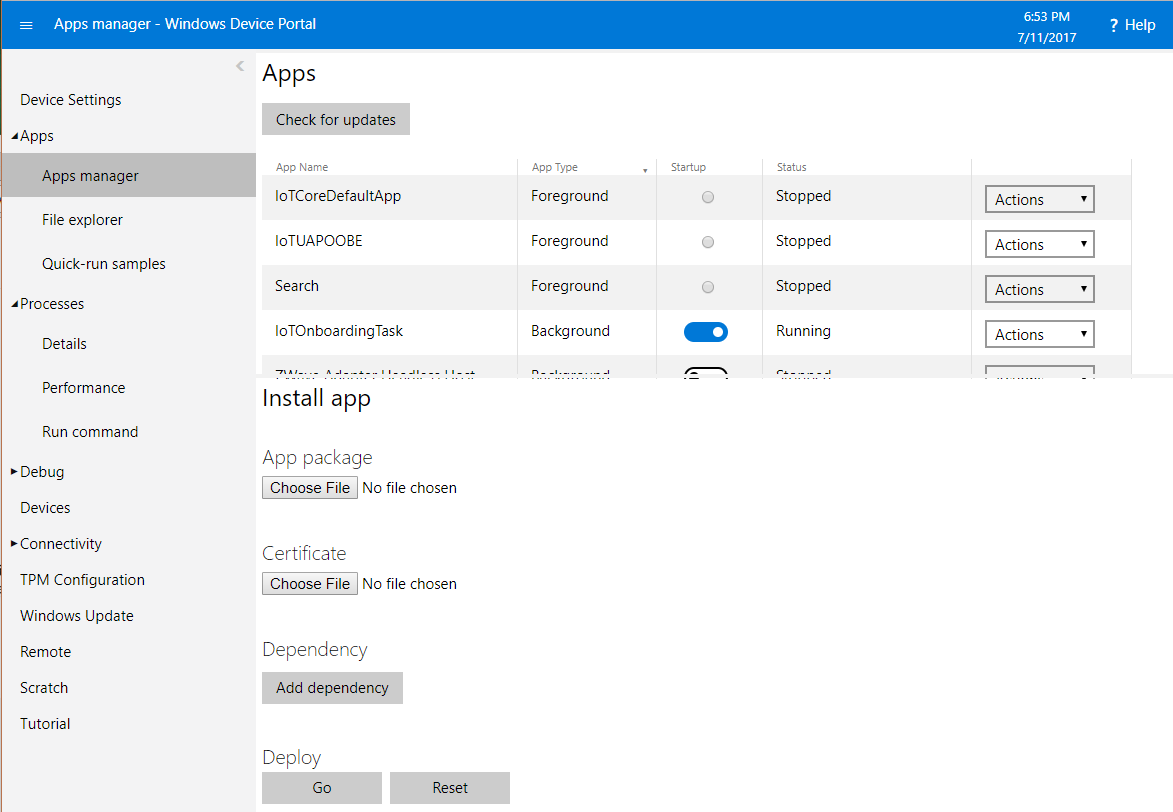
And now, Restart it.
In just a few minutes, you should see the Pi reboot and automatically launch our monitoring app. Awesome, we’re developers now!
Completed Code Download Link - Here
How to modify this to query your own WHATEVER
Simply change the body of GetStats() here to modify this to query whatever you like. So long as it returns a JSON body, this format will work.
private async void GetStats() { //add your own query for ANYTHING here HttpClientHandler handler = new HttpClientHandler() { AutomaticDecompression = DecompressionMethods.GZip | DecompressionMethods.Deflate };

  using(var client2 = new HttpClient(handler)) { // whatever URL you want to hit should be here string url = "https://yourAPIUrlhere.com";

    //if your URL or service uses Bearer Auth, use this example client2.DefaultRequestHeaders.Add("Authorization", "Bearer YourKeyHere");

    HttpResponseMessage response1 = await client2.GetAsync(url);
    string ham = await response1.Content.ReadAsStringAsync();

    var Response = JsonObject.Parse(ham); //var hits = Response.GetNamedValue("views").GetNumber();

    //set a breakpoint here to inspect and see how your request worked.  Depending on the results, use the appropriate value for GetNamedValue() to get the syntax working

    var bestCatname = "Lyla";

    //this block below handles threading the request to change a UI element's value

    /\*await MainPageDispatcher.RunAsync(CoreDispatcherPriority.Low, () => { / / Your UI change here //HitCounter.Text = hits.ToString("N0"); }); \*/ //HitCounter.Text =viewsdesuka.ToString(); cat = "Lyla";

  }

}
Resources and thanks!
I could not have done this without the support of at least a dozen of my friends from Twitter. Special thanks to Trond Hindes, and Stuart Preston, and those who took the time to weigh in on my StackOverflow question.
Additionally, these posts all helped get the final product cobbled together.
- This forum thread on Hackster contained the clues I needed to eventually learn to draw the display
- How to add a header to a web request C#
- How to parse JSON from a Web Request C#
- How to debug in Visual Studio
- How to enable GZIP Decompression in C# HttpClient
Now, what kind of stuff have you written or do you plan to write with this template? Be sure to share here, or on Reddit.com/r/FoxDeploy!
Finally, please share! If you come up with something cool, add it to a subfolder of Look what I made, here!


